Photos of Baskets using these Dyes
To see more photos of these materials made into baskets go here:
Cherokee Baskets with these dyes
To see more photos of these materials made into baskets go here:
Cherokee Baskets with these dyes


Now this dye stuff will produce a color anywhere from Scarlet Red to Purple; if the dye stuff gets wet before use, it will only produce purples. Other recipes call for adding at various times, oxalic acid, stannous chloride, stannic chloride for a more scarlet color. Other recipes call for oxalic acid, cream of tartar and tin spirits, stannous chloride and black oak bark. I won't go into how the *spirits* are made, but I suspect you'd need to live in the country with lots of cows around.
If you'd like to try these other recipes you'll need the book: The Art and Craft of Natural Dyeing, Traditional Recipes for Modern Use, by J.N. Liles of the three books I got this one seems to have much better directions in it for the home user. He gives the recipes for cotton and wool as well as silk. He still uses degrees for heat and ozs etc for amounts, so I'm guessing a lot of time on the amounts here, however, he also gives tbs or tsp measurements for smaller amounts. He also gives you a good many variations of materials i.e. if you don't have tannin you can use say 2 oz of Tara Powder, he also tells you where you can purchase some of the other items he uses in his recipes. And he has a number of variations to all his recipes from the simplest to the most complex. His book is available at Amazon or any other online book seller as well.
The photo above was taken just after removing the cane from the dye pot. This seemed to lighten even after leaving it in the dye pot over night, so it might be that you would get a brighter color if you removed it after the dye solution begins to cool or after removing it from the heat. There seems to be a black residue that forms in this dye if it gets cool, so dyeing and removing the cane after a couple of hours appears to work better than if you leave it over night.
I have also added some honeysuckle to the dye pot to see what it will do. The top photo is the Cochineal after it has dryed.


Now, I had used a tannin or tara powder mordant on this coil of cane prior to adding it to the dye pot. I did not use any alum because I didn't want the dye to turn too yellow, I'm looking for more of a tan color.
Sources also suggest adding a copper modifier towards the end of the dyeing process.
The photo at the top is the cane after it is dry and the photo at the bottom is the cane which has dried some so it's not fresh out of the dye pot. Photo of it dry coming.
This Dye stuff is really easy to use and gives you good color on the cane.
To see this dye in a woven basket - PHOTOS
Notes on using Natural Dye Stuff:
And most important have fun.....:)


This dye material will give you an orange to orange/red color without any mordants or modifiers.
The Recipe:
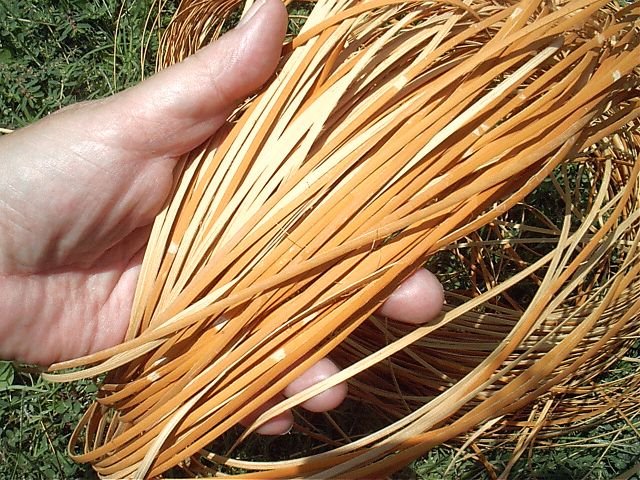
This dye material can also be done in a cool or room temperature dye pot without using heat but you would need to soak the Annatto seeds over night. This particular dye material does not need a mordant, however, sources say that adding a couple of teaspoons of vinegar to the rinse water after dyeing will give you a salmon color. I did not do anything to the cane before putting it into the dye pot except rinse it in a mild (PH) dish soap.
The photo at the bottom is the dyed cane after taking it from the dye pot and is still wet. The photo at the top is the dried cane. This is really a nice color of red/orange. I did not grind the seeds for this batch but next time I will try grinding them before adding them to the dye pot which may yield more color and will try it with 1 cup of Annatto seeds to see what result I get. This however, really looks like Blood Root when dry, amazing.
When grinding seeds or other dye material a small coffee grinder can be used. They are rather inexpensive and can be found at most stores like K-Mart, Wal-Mart or Target. This is a handy gadget for the home dyer.
To see this dye in a woven basket - PHOTOS


I have done this batch a bit different to see how it comes out. I am first going to dye the cane in the Walnut dye and then after it appears to have gotten as dark as I can get it, will add it to an iron solution, the color modifier, to see what result I get.
This can also be done in an all in one dye method and that is usually the preferred method, however, I'm trying to see just exactly how much iron would be required to make it that nice chocolate brown. Or if perhaps adding the dyed cane to an iron solution afterwards would make it darker or not work as well.
Once again this dye recipe comes from Sandra Pallie of Oklahoma, she however, uses the rusty nail method for the iron, where I use the iron crystals. Not many rusty nails in my area...:)
Photo at the bottom above taken on the 5th day of steeping in the dye pot. It's beginning to rain in Sunny Southern Cal so might take awhile for this to dry. The photo at the top is the honeysuckle which was dyed in the same dye pot at the same time as the cane. Neither have had iron added to them and are still wet from the dye pot. The top two photos are of the dried honeysuckle and cane.
The top photos are also after I put it in an iron solution. I just dipped and swished these a couple of times in the iron solution, so as you can see they really came out dark. I used a fraction of the iron that I used in the dye in one method.
I have also discovered another source of making iron solution is steel wool pads. If you add say one pad to a pint or quart of water with some vinegar, you will also get a very nice iron solution for dyes.

There are two types of fibers from what I can gather.
Tannin is usually used on all Vegetable fibers because it helps either the mordant of Alum or any of the others adhere to the fiber better. Tannin can be used as a pre-mordant or alone as a mordant but most of the sources suggest using the Tannin first or also in the all in one dye method for best results on all vegetable fibers.
Although Tannic acid is the best tannin source for bright and light colors, it may not be available in which case tannin-bearing plants will work as well.
For 1 ounce of Tannic acid you can use:
I used the tara powder which is about 50% tannin, I added 1/4 cup to a gal of water and then added 1 coil of cane and leave it sit overnight. Depending on the tan color achieved, it will mordant several coils of cane. Once the color reaches a light tan the Tara Powder has been used, so you will need to make another batch to mordant more cane if you desire.
If you use Tara Powder put it in a nylon stocking to prevent the residue from floating around in your solution.
Many sources will tell you that a pre-mordant to a cellulose fiber will make the dye adhere better to the fiber and prevent fading of the natural colors.


When you do not heat the dye pot this is known as the cold method of dyeing and you can do this with some natural materials but not all.
After I removed the cane from the dye pot, I then added some honeysuckle to it, the honeysuckle likewise had been soaked for at least over night in the Tannin solution; I should have enough dye color to also get a nice red color on this, but we will see.
The Tannin Solution is suppose to help the dye from fading as it usually does after several days. On the honeysuckle test I did with the cane, the dye eventually got so light you could no longer even see it. Tannin is suppose to help prevent this. Tannin is what is called a pre-mordant or a mordant; in most sources I have read tannin applied either first or with the dye material is a mordant for vegetable fibers, more on this later as well. Tannin is also used as a pre-mordant for alum on vegetable fibers, you soak your cane in Tannin over night, then soak it in an Alum solution over night, then add it to your dye pot. Takes longer but it is suppose to really help your dye adhere to a vegetable fiber.
Likewise you will notice that in this dye pot I did not add salt. Salt is known as a leveling agent, it makes the dye apply evenly on the fibers, so I will have to try this in my next blackberry dye batch. Now depending on how dark the honeysuckle gets, I will probably also at some point boil the blackberries for about 10 to 15 minutes and see if the fruit will bear any more dye. In some cases, heat will extract more color from the dye stuff and you will get a faster dye than using the cold method. After you boil the dye stuff, you place your cane into the dye pot and let it set at least over night or longer depending on how deep of a color you want. It also appears at some point the fibers just don't accept any more dye.
When you are determining the amount of dye stuff to use in your dye pot, it is not the amount of water in the dye pot that determines the strength of the dye. The amount of water in the dye pot does *not* dilute the dye color. The amount of dye stuff is what determines whether the resulting color will be light or dark and the amount of dye material you put in the dye pot to be dyed. Generally you use the same weight of dye stuff that is equal to the material you are dyeing. So 4 oz of cane would require 4 oz of dye material. The dyed material, in our case, cane, will absorb the same amount of dye in 2 gals as in 4 gals of water, but you need to make sure you've added at least 4 oz of dye material. Then depending on how strong you want the color you can either add or subtract dye stuff from the initial amount used. If it is too strong, you might use it to dye another coil of cane in a lighter shade.
Natural dye colors often will not be consistent even when using the same dye stuff. Most natural materials require heat to extract the color. Powered dyed stuff can be mixed into a smooth paste with a little warm water then added to the dye pot and simmer for 1/2 hour. Generally you will need 1/2 the dyed material weight for the dye stuff. So with a 4 oz coil of cane you would need at least 2 oz of the dye powder. This will give you a strong dye pot, which you can then gauge from there whether you wish to add or subtract from that amount.
If you dye in a cool dye pot, then it can take several days to get the color you want. Some dye stuff also may require heat however for best results.
I would say, 2 cups of red onion is not 4 ozs in weight, so next time I'm going to double or triple the amount of red onions skins.
I must say this is an extremely interesting subject because if you pre mordant you will get various colors, then add the fibers to the dye bath the colors will dye depending on the type of mordant used and then if you add a color modifier after you dye the same fibers, you will get even more variations of colors. Fibers that are say pre mordant in all five mordants below will yield 5 different colors, then when these fibers are added to say a madder dye bath, you get 5 different colors again, then using the same dyed madder fibers and putting them in 5 different color modifiers you get another 5 different shades. So out of 5 different mordant fibers groups, you would get up to 15 different color variations.
The basic difference between mordant and color modifier is when you apply it to the cane. A mordant is applied before putting the cane in a dye bath. A color modifier is used after you have dyed the cane. If you use the all in one method, they probably become more color modifiers than mordants. Plain table salt or other salts are also considered a mordant, although they would probably not be considered color modifiers. Anything applied to the cane to help the color adhere to the cane would be a mordant and some mordants work better with some dye stuff than others. If the color modifier (mordant) is applied after dyeing then you are more likely to get a change in the original dyed material. Putting your cane in a mordant solution alone prior to dyeing it is said will help the dye *stick to* the cane, if you add it to the dye pot at the same time, the mordant has a tendency to adhere to the dye and leave the cane out of the loop, thus not being quite as affective. I think I really like blood root...you get a really nice good clear or dark color with none of this fuss!!
The major types of Mordants are: Alum, copper, iron, tannin and rhubarb leaf solutions.
The major types of Color Modifiers are: Acid (clear vinegar), Alkaline (washing soda), Copper and Iron. Wood ash if you have a wood stove or fire place. Clear vinegar and ammonia can also be used as modifiers. One or two teaspoons of vinegar makes an acidic modifier and a few drops of ammonia makes an alkaline modifier.
So as you can see both copper and iron depending on when you add it to your fibers will give you a different result.
The mordants help the dye *stick* to the fibers so to speak and if added before you dye the fiber gives you also more control over the coloring process.
For color modifiers: 1 tablespoon of modifier crystals dissolved in 2 pints of boiling water will be enough for several applications because you only use 1 or 2 teaspoons of the modifier solution each time.
You can pre mordant, dye and then use more than one color modifier as well. Put the dyed fibers into one modifier and then put it into another. Sometimes more than one pot or kettle or bowl is necessary, since you need to keep the modifiers separate. The all in one method probably wouldn't work if using more than one mordant or modifier.
Actually it appears that any of the mordants can also be used as color modifiers, if used after the fiber has been dyed and any of the color modifiers can also be used as mordants. Tannin can be used as a dye, as can any of the other mordants, since they will give give a different shade to the original fiber. Tannin produces tans, copper a pale blue, alum a yellow and rhubarb a grayish tan.
All you need do is add 1 to 2 teaspoons of the mordant or color modifiers to a pot of water, 4 to 8 gals, although a gal would work, and stir well, then add your fibers. However, with color modifiers you won't be able to see the change if you add it to your dye pot, so making a modifier solution say with one gallon of water would seem to work as well. Then after you have dyed the cane you can then put it into the color modifier solution. You do not need to leave the cane in these modifiers for very long to see the changes. Just leave it in long enough to get the desired color and in some cases that may not be more than a minute, give or take a few seconds.
For acidic modifiers, most common is clear vinegar, add the dyed fibers and simmer for 5 to 10 minutes. Remove the fibers when the color changes, rinse well. You can also do this in a cool solution, just take bit of vinegar say in a bowl, then a sample piece of your cane and dip it into the vinegar. This one will help some reds, as in my red onions. You should however, test any of these on a sample before immersing your entire coil of cane into the solution.
For alkaline modifiers, most common is washing soda (Arm & Hammer Soda) add the dyed fibers, no need to heat, soak them for about 1/2 hour, if the color change is not enough, remove the fibers and add more alkaline modifier and then add the fibers again. Repeat this until the desired color is achieved. Remove the fibers and rinse well. This one likewise can be done in cool water, this will turn towards yellows.
For copper add the fibers and simmer for 10 to 15 minutes until the color changes, remove the fibers and rinse well.
For iron add the fibers and simmer for about 5 minutes, remove fibers and rinse well. (this may not work with walnut - but I am certainly going to give it a try, watch for the results!). I did a couple of samples of iron modifiers and you really need very very little of this to change the color. My water was very light yellow and it still turned one sample grey, this was the cane that had the alum added to the dye pot while dyeing and the other really black, this was the cane that was dyed with red onion. So start with just a very little and if need be add more unless you want black, then a larger amount is needed.
Let's just say, you will probably get different color results with cane or reed than you do with wool. You also may or may not need more dye stuff for cane and reed than you would for wool.
Also remembering that Hamburg cane has already been *chemically treated* to remove the hard outer shell, so by rinsing and washing the cane first in a mild dish soap, this might make a difference as well.
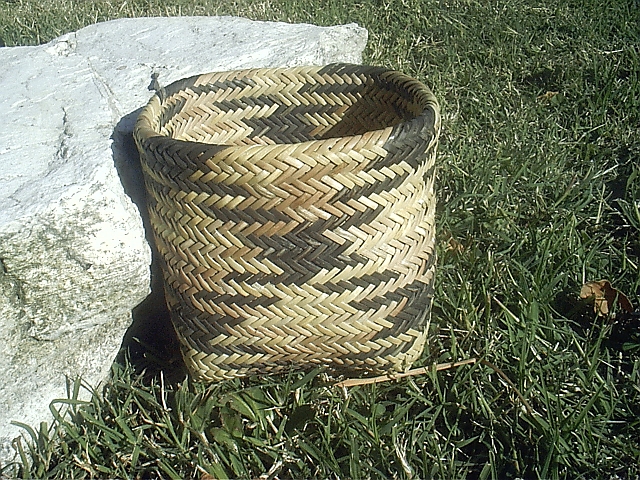
This is the finished basket using the dyes below. As you can see, I think the red onion turned out way to light and the beets had too much alum added although it did turn out with a nice yellow and the pomegranate has too much iron in it which turned it quite black.
In the next batch I will try adding just 1/2 tsp of iron or less to the pomegranate but first I might try getting just a nice dark red color and also add less alum to the beets once again starting say with 1/2 tsp and working in more if needed for a more pale yellow and also trying just the beets to see how deed the red becomes.
To see photos of the blood root and walnut dyes in finished baskets click this link: http://www.flickr.com/photos/cherokeebasketweaver/


Remember this method will work for any of the Onion Skins, Red, Yellow or Brown. The long you let it stand the darker the color will be as well. I have found the Brown Onion skins to produce the best color thus far, however, I added more than 2 cups of crushed skins.
With 2 cups of red onion skins, my cane was much too light as seen above. You might also add 1/2 or 1 cup of vinegar to your dye pot or after dyeing you would put the cane into a solution of vinegar to enhance the red color. Not sure this would work on the Brown Onions.
This is the Alum Solution which you can use to soak your cane in before you add it to the natural dye pot. Although this is referred to in most text as a mordant, it is also a color modifier as you can see from what happened when dyeing beets with Alum added. Some texts will also tell you to treat your material with tannin solution before soaking it in the Alum Solution. The washing soda is added to the Alum Solution to help the material absorb the Alum. Tannin and Alum can both be purchased at most basket shops online as well or through Dharma Trading Company via their online shop.
Depending on how dark you want the dye bath, you can soak the material in Alum more than once but it is suggested you treat the material with tannin first.
Remember in most cases for a really deep and bright color result you will need to apply the alum mordant at least twice. You may also want to test your dye material to make sure the Alum will not modify the color as it did with the beets.
Alum Recipe when using 1 coil of commercial cane:
The all in one method just adds the dissolved Alum and Soda to the dye pot along with the dye material and cane.
Tannin instructions coming or are already above.
Remember, Alum can also modify your dye color, so you may want to experiment to see what it will do with your natural dye material.


Depending on how dark you want the material, you will let it sit in the dye pot overnight.
Generally the dye material is first soaked in an Alum solution, this solution is used to help the dye adhere to the dyed material better and it also gives the dye a clear color.
As you know beets are a deep red and when cooked much of that juice is a nice deep red as well and would probably make a really pretty deep red color on commercial cane depending on how long you let the cane sit in the dye and the amount of beets you use. However, since I used the all in one method for this dye batch, I will never know. I think this is one disadvantage to using the all in one method for dyeing, you don't get to see the original dye material in it's natural state.
The dye was originally red from the beets, then turned a nice golden orange and then flipped over into a quite vibrant yellow. This is probably a result of the Alum and/or Soda that was added.
Using just the beets and table salt would probably give you the deep red color only from the beets, which I'll try next time.
The top photo is the cane wet and the bottom is the cane dry, it came out a real nice ecru color. And this from Beets with Alum and Soda added.
I would probably not add the alum or washing soda to this if you want a nice red dye and once again you may want to increase the amount of beets used for dyeing. I also might try a vinegar color modifier to enhance the red.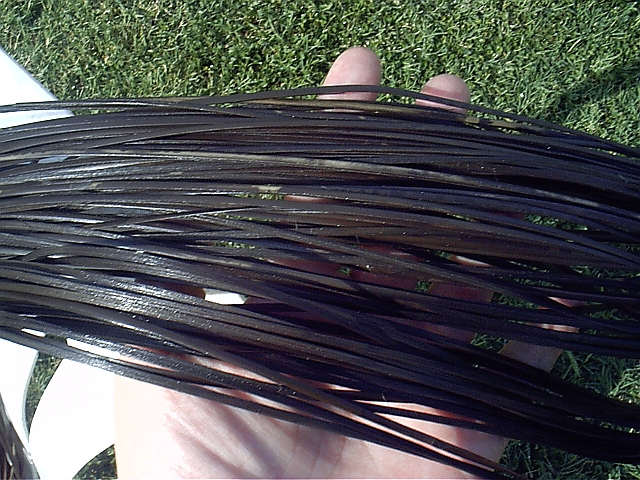
Looks a lot like my Walnut Dyed Cane and this could probably be used as a substitute for the Walnut.
Iron will always make your dyed material more muted and dark.


I use a stainless steel stock pot for dyeing with iron mordants.
The resulting color is shown in the photo above. Alum or Iron can also be added. Alum is usually added before dyeing but the Iron is considered a color modifier and is added after dyeing. You can mix these right into the dye pot all at the same time or you can put your cane into an Alum mixture before adding the cane to the dye pot. I am using Iron as a color modifier so I have dyed the cane using just the pomegranate and then added the Iron after I let it sit overnight because I want to see how the color is changed.

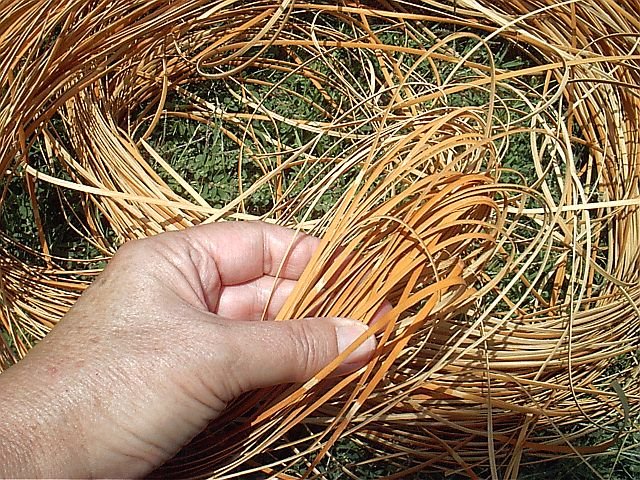
The photos above are of commercial cane dyed with bloodroot. These instructions are from Sandra Pallie a citizen of the Cherokee Nation in Oklahoma and member of the Cherokee Artists Association. This is as she instructed me:
What you need:
Cut the blood root into pieces and place in a nylon stocking, this eliminates the need to strain your dye bath and keeps the natural material from cluttering the dye bath up.
Combine the water, blood root and salt in your dye pot and boil it for about 10 minutes. Then add your cane (or other natural material) continue to boil for a few more minutes. Remove from the heat and set it aside for 1 to 2 hours.
Now check your cane by taking a small piece out of the dye pot to check the color. This is probably the most important part of the process, since it is this checking that will show you the color you have obtained. Remember when wet the cane color will look dark, so if you let the cane dry, you will get a better idea of what the color will be when you remove it. If the color is too light, you can at this point add more bloodroot boil the mixture for another 10 minutes and again let the mixture set for an additional period of time. The length of the time you leave the cane in the dye pot depends on the color you want, darker takes longer than lighter and will require more dye material. Your color will be anywhere from a pale yellow to a dark burnt orange.
Adding alum to the dye bath will turn the blood root to a more red-orange. So it just depends on what color you want and the best way to achieve the desired color is to take the basics and experiment. Alum is considered a mordant and there are likewise other mordants you can experiment with to see if and how it will change the color.
Once you have finished or gotten to the desired color, you can put the remaining dye bath into a container and freeze it for future use. It will last for about a year. Any remaining roots you have you should also be put in the freezer for future use.
Mike Dart, also a citizen of the Cherokee Nation and a member of the Cherokee Artists Association, brings his dye to a boil and then simmers it for about 1/2 hour, so with every basket weaver who uses the natural dyes, the process becomes one of personal preference.
I'm new at this so, I'm still experimenting.
The cane dyed in the photos above, was made with 1 gal of water and one cup of blood root, however, 2 cups of blood root would have given me a darker color and 2 gals of water would have given me a more consistent color since the cane could have circulated in the water better. Since this was my first time trying this, the color came out good but could have been darker. I also simmered my dye bath with the cane for about a 1/2 hour, then set is aside for a short time and simmered it again. I repeated this process for several hours however, Sandra tells me it should not take more than 2 hours to reach the desired dark color. If by that time it has not gotten dark enough, then you would need to add more blood root and repeat the boiling process again.
I did not use the alum mordant since I was looking for a color which would match that used by Eva Wolfe in her baskets. Her bloodroot is darker than mine but it appears she likewise did not use any type of mordant in her dye for at least some of her baskets.
This same dye method will work on any natural material including woods splits, honeysuckle etc and reed used in Cherokee basketweaving as well. You will of course need to vary the recipe depending on the amount of material you are dyeing.
Well if it grows in the wild and is either small enough to fit in a dye pot or can be cut small enough to fit in a dye pot, it can probably be used to dye cane for baskets.
Other examples of natural dye material:
Dyes used by the early pioneers:
http://www.pioneerthinking.com/naturaldyes.html
So look around you and see what is available!
I use Hamburg/Bleached commercial cane for my baskets. The bleached cane comes very white, so I find, to restore it to it's near natural color, Yellow Onion Skins will restore some color to it. Just enough color to reduce the white effect of the bleached cane color.
Here are some interesting sites about Yellow Onion skins and how they were used:
http://www.pastrywiz.com/easter/dyeingeggs.htm
http://www.the-onion.com/history.htm
It is the outer skin of the onion that is used. Red Onions likewise will produce a nice mauve color which is used for dye.
The Tree:
http://www.cirrusimage.com/Trees_black_walnut.htm
This above site has some good information on the black walnut tree. It is the hull of the Black Walnut fruit (nut) that is most often used in Cherokee dyes. This was a dye used by ancient Cherokee for dyeing baskets.
Modernly there is available Walnut Powder which is used in Cherokee dyes. This is a *crushed* powder made from the Walnut Hull and can be purchased at most basketry shops.
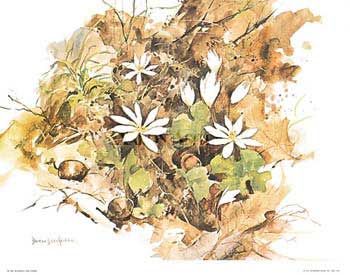
This is what the Blood root plant looks like above the ground. The root system below the ground it what is used in dyes. These roots are long tubular roots. The nuts lying among the plants in this photo are acorns, not part of the Blood root plant. The little white flowers are those of the Blood root and it blooms in the spring of the year. Although some sites call bloodroot extremely poisonous, for dye purposes, I don't think you're in any danger, but I don't think I'd say drink a glass of it...:) Just rinse your hands well when you're using it.
More scientific info on the Blood root:
The last link gives you info on medicinal uses of Blood root, apparently the effectiveness of Blood root used in this manner is controversial.
This is a list of the tools you need for using natural dyes:
I am going to post info here on natural dyes and how to use them with commercial cane at present. Any dye recipe that works with wool will also work with cane or reed. You will see a lot of dye recipes on the web for wool. I have learned the dye process from Sandra Pallie, a member of the Cherokee Nation in Oklahoma and member of the Cherokee Artists Association in Oklahoma, with input from Mike Dart and his natural dye process. Listed here are the dyes that were most often used by the Cherokee in the Southeast, which were blood root and black walnut.
I am learning that probably the best dye recipes you find in books are the recipes for Cotton or Linen, if a version is given for those two materials, however, the recipes for wool will also work. I always mordant with Tara Powder first, not so much with Alum, unless it is needed for the color I want, since Alum has a tendency to turn colors yellow. When you're experimenting, rather than the all in one dye method, you might dye your material and then try putting the dyed material into a color modifier solution when you're done. This way you can see how the modifier changes the color. Iron will always *sadden* your colors, Alum is suppose to brighten your colors, but it seems to yellow the colors I've tried thus far. Try a test piece in your color modifier before you put the entire coil of cane in it.
I am also not a chemist, however, I've found in most sources the person writing the book apparently is very chemistry oriented so gives most of the recipes with weights and measures you'd probably find in a chemistry lab. Most commercial dye stuff comes in 2, 4, 6 or 8 oz sizes so that takes some of the guess work out of the measuring. Most recipes also are for 1 lb of material, commercial cane is usually 1/2 lb or little over, so in some cases you need to cut the recipes in half. However, not to worry, if you don't use enough dye stuff, you can always add more before taking your cane out of the dye bath. So this isn't always a precious process.
